View and manage messages
This post is also available in:
![]() 日本語
日本語 ![]() Français
Français ![]() Español
Español ![]() Deutsch
Deutsch ![]() Српски
Српски ![]() Português
Português ![]() Български
Български ![]() 简体中文
简体中文
View messages
To view your messages:
- Open the Mail Panel in one of the following ways:
- Click on the
 Mail button on the Panel.
 - Go to
 Vivaldi Menu > View > Mail Panel.
 - Use the Keyboard Shortcut Ctrl+Shift+M / ⌥⌘M.
- Type “Mail Panel” in Quick Commands.
- Create a Mouse Gesture for the action.
- Click on the
- Click on a folder you want to view.
- The message list and message view will open in a new tab.
- Single-click on a message to view it.
Check for new messages
In Settings > Mail > Mail Settings > Check For New Mail, you can adjust how often the mail client looks for new messages on the server. You can choose between:
- Every minute,
- Every 15 minutes, or
- Manually.
To check for new messages manually in all accounts:
- Open the Mail Panel and click on
 Check All Accounts on the Mail Panel toolbar.
 - Alternatively, when you have Mail open in a Tab, click on
 Check for mail on the Mail toolbar in the top left corner of the window.
To look for messages in a specific account:
- Right-click on the mail account in Mail Panel > All accounts.
- Select Check for Mail.
View messages from the same sender
To view all messages to and from the same sender, either:
- Open a message, right-click on the message header and select Show Messages for Sender.
- Right-click on a message in the list of messages, select Sender > Show Messages for Sender from the context menu.
- Use the Keyboard Shortcut E (make sure you’ve enabled Single Key Shortcuts in Settings > Keyboard > Keyboard Shortcuts).
- Type “Show Messages for Sender” in Quick Commands.
- Create a Mouse Gesture for the action.
Message view
Depending on your Mail Layout and how you open the message, the message can be opened either on the right of the message list, below it or in a new browser tab.
Message toolbar
On the message toolbar, you’ll find the following options:
 Reply,
 Reply to All,
 Forward,
 Mark Read/Unread,
 Move to Folder,
 Flag,
Flag, Label,
 Mark message as Spam,
 Move to Archive (if supported by the email service provider),
 Move to Trash.
 /
/  Show Messages as Text/HTML
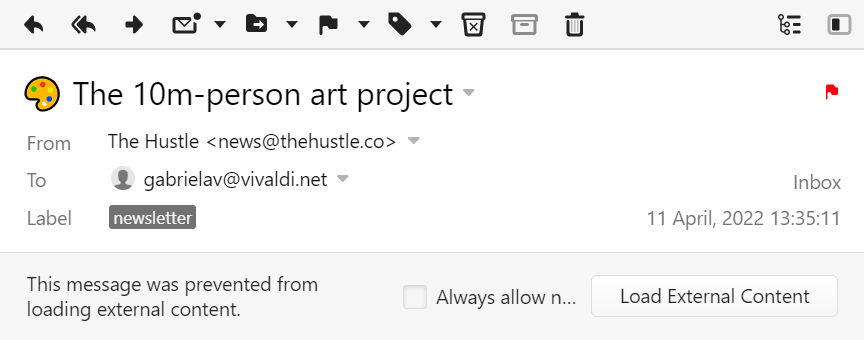
Message header
In the message header you’ll see:
- The subject of the message.
- The flag, if you’ve added one.
- The sender’s name and/or email address.
- Reply To address, if it’s different from the sender’s email.
- The recipients’ email addresses (both To and CC).
- Attachments.
- Labels.
- Folder the message is in.
- Message receival date and time.
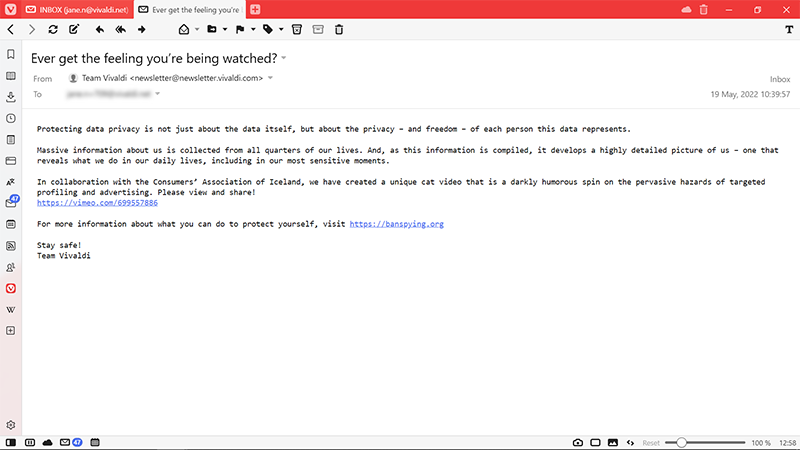
- Notification about external content (if not enabled for sender).
Right-click on the message header section to:
- Move back and forward in viewed messages.
- Copy the basic message info (subject, date and time, sender and recipient emails).
- View the raw message with full message header.
- Filter all messages from the same sender to a Mailing List folder.
- Show all messages in the message thread.
- View all messages from the same sender.
- Show Raw Message (called source or original in some clients).
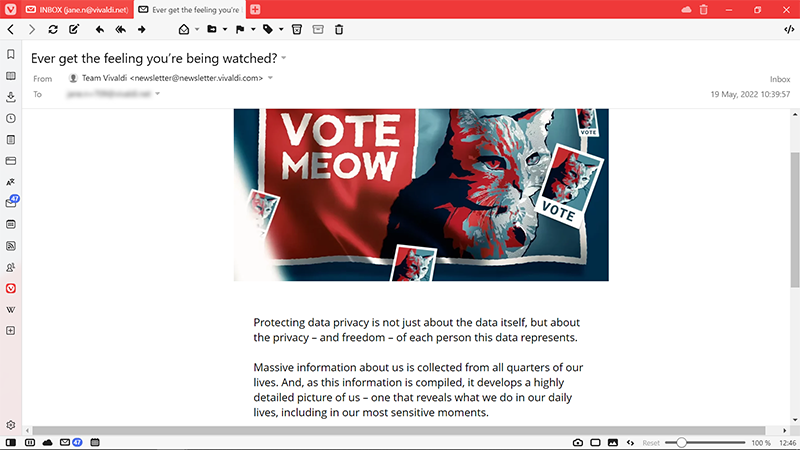
Message body
Below the header you’ll find the main content of the message.
Toggle Plain Text and HTML view
Messages can be displayed in two ways, either as Plaint Text or using HTML formatting. Messages sent in Plain Text formatting, will always be displayed text only, but HTML messages can be viewed in Plain Text as well.
To toggle the message view, either:
- Click on the / Show Messages as Text/HTML button in the top right corner of the window.
- Go to Settings > Mail > Mail Settings > Mail rendering and choose your preferred view.
Message read status
Unseen
New messages that have never been opened are displayed in bold text using your browser Theme’s highlight color and have a dot in front of them. As soon as you open an Unseen message it will be marked as Unread.

Unread
Messages that have been viewed before but have not been read or have not been dealt with. They’re displayed in bold text using your Theme’s foreground color with a dot in front.

Read
In Vivaldi Mail, by default, all messages need to be marked read manually.

To mark a message as read, either:
- Click on the
 Mark Read button in the message toolbar above the message.
 - Right-click on the message in the message list and select Mark Message as Read.
- Use the Keyboard shortcut K (make sure you’ve enabled Single Key Shortcuts in Settings > Keyboard > Keyboard Shortcuts).
- Type “Mark Message as Read” in Quick Commands.
- Create a Mouse Gesture for the action.
To mark a message as read and open the next unread message, either:
- Click on the arrow next to the Mark Read button in the message toolbar above the message and select Mark Read and Go to Next Unread.
- Right-click on the message in the message list and select Go to > Mark Message as Read and Go to Next Unread.
- Use the Keyboard Shortcut G (make sure you’ve enabled Single Key Shortcuts in Settings > Keyboard > Keyboard Shortcuts).
- Type “Mark Message as Read and Go to Next Unread” in Quick Commands.
- Create a Mouse Gesture for the action.
To mark a message thread as read, either:
- Select all messages in the thread using Shift or Ctrl/Cmd key and right-click on one of the selected messages. Select Mark as Read.
- Use the Keyboard shortcut M.
- Type “Mark Message Thread as Read” in Quick Commands.
- Create a Mouse Gesture for the action.
To mark all messages in the folder read, either:
- Right-click on the folder in the Mail Panel and select Mark All as Read.
- Focus on the message list, use the keyboard shortcut Ctrl+A/Cmd A to select them all, and mark all messages as read using the keyboard shortcut K or select Mark as Read from the right-click context menu.
To mark a message unread, either:
- Click on the
 Mark Unread button in the message toolbar above the message.
 - Right-click on the message in the message list and select Mark Unread.
- Use the Keyboard Shortcut Shift+K. To mark the whole message thread unread, press Shift + M.
- Create a Mouse Gesture for the action.
Mark messages read automatically
To mark a message read automatically a couple of seconds after opening it:
- Go to Settings > Mail > Mail Settings > Unread Messages.
- Enable Automatically Mark as Read.
Sort messages
To sort messages in a Vertical layout:
- Click on the sort menu above the list of messages
- Select the criteria for sorting
Messages can be sorted by:
- Message Sender
- Subject
- Received Date
Messages can be sorted both in ascending and descending order. To switch the order, click on the arrow in the top right corner of the messages list, next to the sorting menu.
Display messages with View Filters
It’s possible to toggle the visibility of certain messages in each folder using the view toggle buttons on the right side of the search field. The filtering options include:
 Show Read
 Show messages from Custom IMAP folders
 Show Mailing Lists
 Show Feeds
- Show Junk
 Show Deleted Items
- Show Archived
There are two ways to display View Filters, either as a drop-down menu or as buttons. You can make your choice in Settings > Mail > Mail Settings > Filter View Buttons.
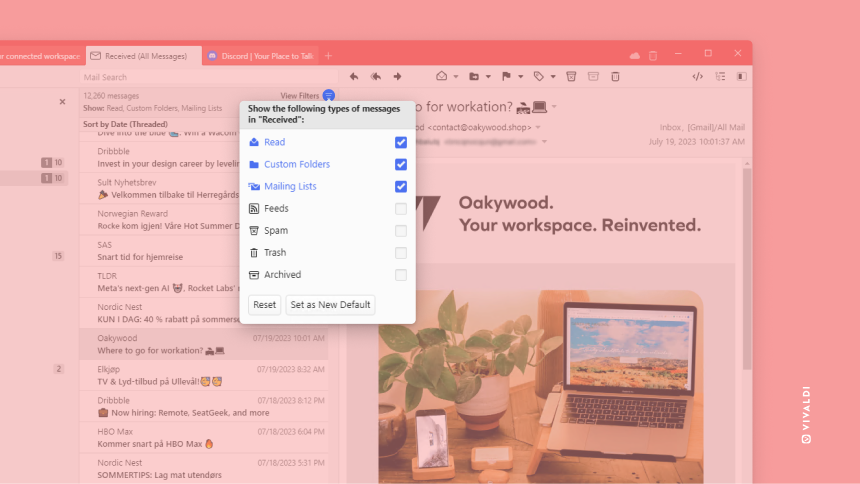
Available options vary depending on the folder type. If the button is in your Theme‘s highlight color the filter has been enabled, if not, it’s disabled.
Search messages
Use the search field above the message list to find emails from certain senders or with particular content. To make the search more precise, you can use “AND”, “OR” and “NOT” operators (make sure to type them in capital letters). You can also specify from:, to:, cc:, body: and subject:.
A few examples:
- United States (messages having both words).
- United NOT States (messages have the first word but not the second).
- United OR States (messages having either word).
- nite OR ates (emphasizing that substring search also works).
- to:“[email protected]” NOT cc:“[email protected]”.
- subject:Vivaldi OR body:browser.
By default search results will be shown from the folder you have open, but you can show results from all folders, by selecting All in the message list search details below the search field.

To save the search and its results as a Filter, click Save on the right side of message list search details.
Move messages
To move a message from one folder to another:
Option 1
- Open the message.
- Click on Move to Folder on the message toolbar.
- Hover over Move from account email/current folder.
- Select the destination folder.
Option 2
- Right-click on the message in the message list.
- Hover over Move and Move from account email/current folder.
- Select the destination folder.
Option 3
- Click and drag a message from the message list to a folder in the Main Panel.
- Release the mouse button to complete the move.
You can also drop the message on Flags and Labels to add the element or to, for example, Unread to change the message’s state.
Add and remove folders
To add a new IMAP folder on the server:
- Open the Mail Panel.
- In All Accounts section, right-click on the account you want to add the folder for.
- Select Create Folder from the context menu.
- Give the new folder a name.
- Click Create Folder.
Alternatively, create the new folder in the web interface of the account or in other clients where you’ve set the account up.
To delete a folder:
- Open the Mail Panel.
- Move messages you want to keep to other folders.
- Right-click on the folder you want to remove.
- Select Delete Folder from the context menu.
Deleting a folder will also delete all messages in the folder.
Print or save a message
To Print or save the message as a PDF file, use one of the following options to open the print preview and settings:
- Right-click in the message body section and select Print.
- Go to Vivaldi menu > File > Print.
- Use the keyboard shortcut Ctrl+P / Cmd P.
In Print Preview, select Save as PDF for the Destination to save the message as a PDF file.
Delete messages
Option 1:
- Open the message.
- Click on Delete on the message toolbar.
Option 2:
- Right-click on the message in the message list.
- Select Delete.
Option 3:
- Select the message.
- Press Delete on your keyboard.
To delete multiple messages:
- Select the messages using the Shift or Ctrl/Cmd key.
- Click on Delete on the message toolbar or right-click on one of the highlighted messages and select Delete.
Archive messages
Some email service providers, such as Gmail and Microsoft, allow archiving messages as a way to keep your inbox clean and organized.
To archive an email:
- Open the message.
- Click on
 Move to Archive on the message toolbar.
Alternatively:
- Right-click on the message in the message list.
- Select Move Message to Archive.
Archived messages can be seen in the account’s and All Messages’ Archive folders.
If the archiving options are not available or are inactive, then the email service provider doesn’t support this feature.
Spam messages
To mark a message as Spam:
- Open the message.
- Click on Mark Message as Spam on the message toolbar.
Alternatively:
- Right-click on the message in the message list.
- Select Mark Message as Spam.